Trim and Export
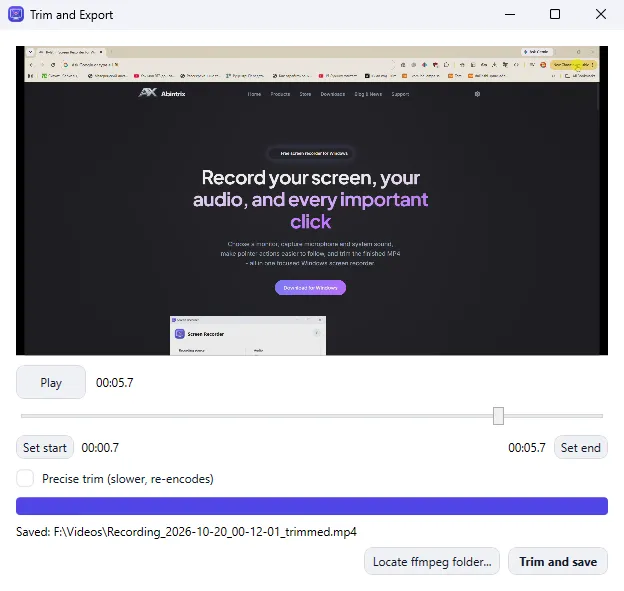
The Trim and Export window lets you cut unwanted parts from the beginning and end of a recording — for example, the moment you were switching to the right window or reaching for the Stop button.
Trimming requires ffmpeg. If it is not installed, the window shows “ffmpeg not found” and the Trim and save button is disabled — see Installing ffmpeg.
How to trim a recording
- Click Play to watch the video (while playing, the button reads Pause). You can also move through the video with the slider.
- Find the moment where the video should start and click Set start. The selected time appears next to the button.
- Find the moment where the video should end and click Set end. By default the start is the beginning of the recording and the end is its end, so if you only need to trim one side, you can leave the other point as is.
- If needed, enable Precise trim (slower, re-encodes) (see below).
- Click Trim and save.
- In the save dialog, choose a name and folder. By default the app suggests the original file name with a
_trimmedsuffix in the same folder, for exampleRecording_2026-10-19_14-35-08_trimmed.mp4. - Wait for the progress bar to fill and the Export complete. message to appear.
The original recording is not changed — the trimmed video is saved to a new file.
Fast vs. precise trim
| Mode | How to enable | Speed | Quality | Accuracy |
|---|---|---|---|---|
| Fast | “Precise trim” cleared | Very fast (seconds) | Lossless — the video is simply copied | The start may shift to the nearest keyframe (usually within a couple of seconds) |
| Precise | “Precise trim” ticked | Slower — depends on clip length and computer speed | The video is re-encoded; quality stays high | Exactly at the points you set |
We recommend trying a fast trim first. If the start or end is off by a second or two, export again with precise trim enabled.